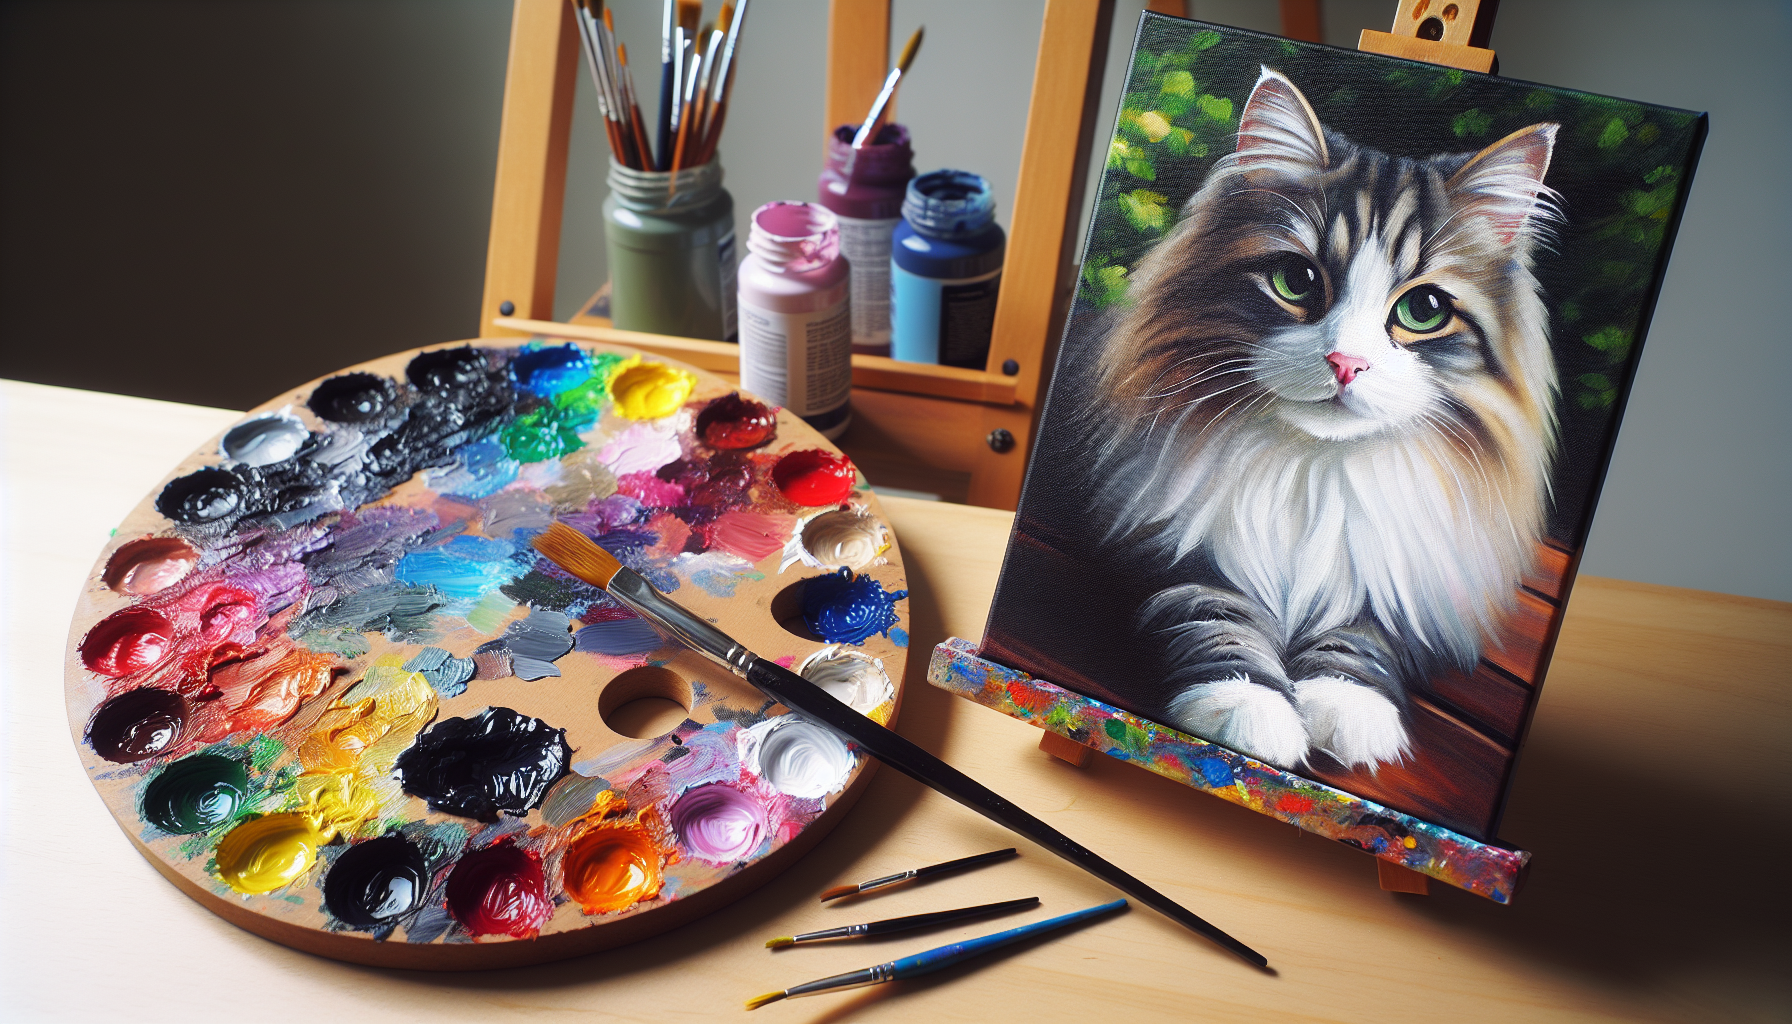
In “How To Paint Cats In Acrylic”, you’ll discover a comprehensive guide designed to hone your artistic skills as it walks you through the process of capturing the elegance and charm of felines using acrylic paint. Drawing from basic tips for beginners to seasoned strokes of expertise, this piece digs deep into techniques, detailing how to imbue your canvas with the delicate beauty of cats’ anatomy, alongside their distinct textures and an array of hues found in their coats. So whether you’re an aspiring artist or an experienced painter looking to challenge your expertise, this article will ensure that you elevate your creativity to new heights.
Choosing the Right Materials
To explore your artistic potential and accurately capture the essence of a cat on canvas, the first and foremost step is to choose the right materials. This may seem trivial but it is an essential step in creating a quality piece of art.
Selecting the Acrylic Paint
Acrylic paint is ideal for beginners and seasoned artists due to its versatility and ease of use. Your cat painting will be depicted with vibrant clarity using acrylic paint as it holds rich color pigment and dries relatively quickly. Nevertheless, there is a wide range of acrylic paints and choosing the appropriate one for your project depends on your experience, style of painting, and, of course, your budget. However, investing in good quality acrylic paints is recommended as they last longer and provide a superior finish.
Choosing Brushes
Brushes are an equally important aspect in creating your masterpiece. A variety of brushes are required to render different textures and details. A larger brush is typically used for background and larger areas of the painting, while smaller, finer brushes are used for intricate details such as fur and eyes. Brushes come in assorted shapes and sizes, each designed for a specific task in the artistry of painting. Therefore, it is important to choose a set of brushes that correspond with your painting needs.
Other Supplies Needed
Apart from paint and brushes, there are a few additional supplies you will require. This includes a canvas, easel, pallete for mixing paints, palette knives, water container for cleaning your brushes, paper towels, varnish, and protective clothing or apron.
Preparing the Canvas
Choosing a Suitable Canvas
Choosing a proper canvas is critical to the outcome of your painting. Canvases come in various sizes, shapes, and materials. The choice of canvas depends largely on your personal preference and the desired outcome of your painting. For a highly detailed cat painting, considering a medium or large-sized canvas is advisable.
Priming the Canvas
Priming is the process of applying one or more layers of paint (known as ground) on the canvas to seal and protect it, to provide a smoother surface for painting, and to prevent the fabric from absorbing too much paint. Depending on the canvas and paint you are using, a primer or gesso can be used for priming. Let the primer dry completely before you begin painting.
Sketching the Cat
Once your canvas is primed and ready, it’s time to start sketching your cat. Using reference photos can be a great help. Start with basic shapes for the body and head, and gradually move on to the details. Be gentle with your lines, as you will paint over them later. Remember, this is only the guide for your painting, it’s not necessary to have every small detail sketched out, but ensure the proportions are correct.

Understanding Cat Anatomy
Observing Cat Proportions
Understanding the proportions of a cat is crucial to making your painting look realistic. Observe how the body of a cat is structured: notice the placement of the eyes, ears, and nose in relation to each other and the size and shape of the body, legs, and tail. Take your time with this observation, as the knowledge acquired will greatly improve your painting.
Recognizing Key Facial Features
Each cat has distinctive facial features that differentiate it from others. Pay close attention to these unique features. Observing the shape of the eyes, the curve of the ears, and the positioning of the whiskers can help in bringing the cat’s face to life on your canvas.
Understanding Body Structure
In addition to the proportions and facial features, understanding the body structure of a cat is equally important. Note the muscle structure, curvature of the spine, and the placement of paws. Observing real cats or photographs can help you in understanding the cat’s body structure.
Creating a Color Palette
Analyzing the Cat’s Coat Colors
Before starting with the paints, spend some time analyzing the colors in your cat’s fur. Keep in mind that it’s not usually just one color. The coat may consist of multiple shades of a color, or different colors entirely.
Mixing Basic Colors
Once you’ve determined the colors in the cat’s fur, it’s time to mix your paints. Things to keep in mind while mixing is to make a generous amount to avoid running out and finding it difficult to recreate the same color, and to make a couple of lighter and darker variations of the same color for doing shadows and highlights.
Creating Tonal Variations
A major part of creating a realistic cat painting is mastering tonal variation. Tones give shape and depth to the figure. Pay close attention to the way light falls on the cat and how it impacts the color of the fur. Usually, the areas receiving less light will have a darker tone of color whereas the areas receiving more light will have a lighter tone.

Mastering Fur Textures
Learning Different Fur Types
Cats come in a variety of breeds, each with a different type of fur. Some cats might have smooth, short hair, while others might have long, fluffy fur. The way you paint the fur should reflect these differences.
Creating Short Fur
For painting short fur, use short, quick brush strokes. This gives the illusion of short hairs. It is also important to follow the direction of the fur growth to make it appear more realistic.
Painting Long or Curly Fur
Long or curly fur can be more challenging. For long fur, use longer brush strokes and layer the colors to give the fur dimension and depth. Curly fur can be achieved by using a round brush to create loops and texture.
Adding Depth and Dimension
Utilizing Color Values
Utilizing the different values of colors is important for creating depth. Lighter values can make an object or area appear closer, while darker values make it appear further away. Using a range of color values in your painting will create depth and interest.
Applying Highlights and Shadows
Highlights and shadows are what give a painting its three-dimensional appearance. Observe where the light source is coming from and how it interacts with the cat. This will assist you in realistically applying the highlights (the lighter parts) and shadows (the darker parts).
Creating a 3D Effect
By carefully combining color values, highlights, and shadows, you can create a beautiful 3D effect in your painting. This makes your cat appear more lifelike and dynamic on the canvas. Remember: practice makes perfect.
Capturing Expressive Cat Eyes
Giving life to the cat’s expressive eyes can make your painting even more charming.
Understanding Eye Anatomy
Understanding the basic structure of a cat’s eye will give your painting a more realistic look. Pay attention to the shape of the eyes, the color of the iris, and the size of the pupils. Also, note the reflections and shadows that are found in the eye.
Adding Liveliness with Catchlights
Catchlights are the small, bright highlights in the eye caused by reflected light. Adding these will allow the eyes to sparkle and bring an overall sense of liveliness to your painting.
Recreating Reflective Surfaces
The glossy surface of an eye is reflective. When painting eyes, observe and imitate the reflections seen. It could be anything from a hint of the window or lamp that’s casting light, to the vague outline of the figure taking the photograph.
Painting Whiskers and Fine Details
Using Thin Brushes
When painting intricate details like whiskers, fine brushes are your best tool. Choose a brush that is thin and has a good point. This will allow for neat, precise lines.
Choosing the Right Colors
While it may seem intuitive to paint whiskers white, most whiskers are actually more of a cream color or even darker, depending on the lighting. Analyze your reference photo carefully to choose the correct color.
Adding Whiskers and Other Details
Whiskers are among the last things you should paint, after you’ve finished the rest of the face. This is because they sit on top of the fur. When painting whiskers, try to create one smooth stroke for each whisker to keep them looking sharp and fine. Also, don’t forget about the little bristles above the eyes, these small details can add a lot to the realism of your painting.
Adding Backgrounds
Deciding on a Background Style
If you want your portrait to stand out, opt for a simple, minimalist background. Conversely, if you seek a more complete scene, consider painting a detailed background. The choice entirely depends upon your preference and the style of painting desired.
Creating Depth and Interest
The background shouldn’t distract from the main subject but should enhance it. Use color values effectively to create depth and interest. Also, subtly echo some of the colors from your cat in the background to create harmony.
Enhancing the Cat’s Presence
A well-painted background can help to enhance the presence of the cat in your painting. Use complementary colors and capture the play of light to make your subject pop.
Finishing Touches and Tips
Signing and Protecting the Painting
Once the painting is finished, it’s essential to sign your artwork. This can be done using a small brush and contrasting paint. Afterwards, to protect your painting, apply a layer of clear acrylic varnish. This not only gives your painting a professional finish but also protects it from dust and UV rays.
Troubleshooting Common Issues
If your cat isn’t looking quite as expected, there’s no need to panic. Mistakes and revisions are common while painting. It’s essential to remember that acrylic paint is versatile and forgiving. Any mistake can be painted over once it has dried. Just keep practicing and reviewing your work with a critical eye.
Additional Tips and Techniques
Here are a few additional tips: always take breaks to avoid getting overwhelmed, review your work from a distance, paint in good light, and most importantly, enjoy the process. With practice, patience, and passion, soon you’ll be able to paint cats in acrylic with ease.