In this informative article, you will learn the art of painting a face with gouache, a versatile and vibrant medium. As a painter, your ability to depict the intricate details of the human face is crucial in creating lifelike portraits. By following the step-by-step techniques and expert tips provided, you will gain the necessary knowledge and skills to confidently work with gouache and achieve stunning results in your portraits. From selecting the right materials to mastering the delicate play of light and shadows, this article will guide you through the process of capturing the essence of a face with this captivating medium.

This image is property of images.unsplash.com.
Choosing the Right Materials and Preparation
Selecting the Gouache Paint
When it comes to choosing the right gouache paint for painting a face, you’ll want to consider factors such as the quality, color range, and opacity of the paint. Opting for artist-quality gouache paints will ensure better pigmentation and color vibrancy. Look for a gouache set that offers a wide range of colors, including a selection of skin tones. This will allow you to accurately and beautifully portray the various shades and tones of the human face. Additionally, consider the opacity of the gouache paint, as this will affect the layering and blending techniques you can use in your artwork.
Choosing Brushes and Tools
Selecting the right brushes and tools is crucial for achieving precise and detailed facial features in your gouache painting. For painting portraits, it’s recommended to use brushes that have a fine tip and good control. Synthetic brushes are a popular choice for gouache painting due to their ability to hold and distribute the paint evenly. Look for brushes in various sizes to cater to different areas of the face and to create varying brushstroke effects. Additional tools such as a palette knife and a watercolor palette can also come in handy for mixing colors and creating different textures.
Preparing the Surface
Before you start painting, ensure that you have a suitable surface to work on. Gouache can be painted on various surfaces, including watercolor paper, canvas, or illustration board. However, it’s important to prime the surface if necessary to prevent the paint from bleeding or soaking into the material. If you’re using watercolor paper, ensure that it is thick and water-resistant to handle the moisture of the gouache. Additionally, you may want to lightly pencil in the basic facial structure or guidelines on the surface to help with your composition and proportions. This can easily be erased later during the detailing process.
Understanding Facial Proportions
Basic Facial Structure
Understanding the basic facial structure is essential for creating realistic and proportionate portraits. The face can be divided into three equal parts vertically: the forehead, the midsection (where the eyes are positioned), and the lower part (including the nose, mouth, and chin). Horizontally, the face can also be divided into thirds: the hairline to the eyebrows, the eyebrows to the bottom of the nose, and the bottom of the nose to the chin. These divisions serve as a guide for placing and positioning the different features of the face accurately.
Reference Points for Proportions
To further ensure accurate proportions, it is helpful to identify key reference points on the face. These reference points act as a guide for positioning the eyes, nose, and mouth in relation to each other. The eyes, for example, usually sit at the halfway point between the top of the head and the chin. The width of one eye is typically used as a measurement to position the eyes apart from each other. Similarly, the bottom of the nose lines up with the eyebrows, while the mouth is often located halfway between the nose and the chin. These reference points provide a solid foundation for achieving realistic facial proportions.
Tips for Accurate Measurements
To ensure precise measurements and accurate facial proportions, it’s important to pay attention to the angles and distances between different facial features. A helpful tip is to use your brush or pencil as a measuring tool. For example, by holding your brush vertically to the side of the face, you can determine the angle of the jawline or the width of the forehead. Taking these measurements and angles into consideration helps create a more lifelike representation of the subject. Remember that minor adjustments can make a significant difference in achieving a realistic portrait.
Mixing Colors
Color Theory and Mixing Basics
Understanding color theory is crucial for creating harmonious and realistic skin tones. Gouache paints can be easily mixed to achieve a wide range of colors. The primary colors of red, blue, and yellow can be combined to create secondary colors, such as green, orange, and purple. Mixing these secondary colors with the primary colors in varying proportions allows for further color variations. It’s essential to experiment with different color combinations and ratios to achieve the desired skin tone. Remember, skin tones can vary greatly depending on factors such as lighting, ethnicity, and individual characteristics, so don’t be afraid to experiment and adjust.
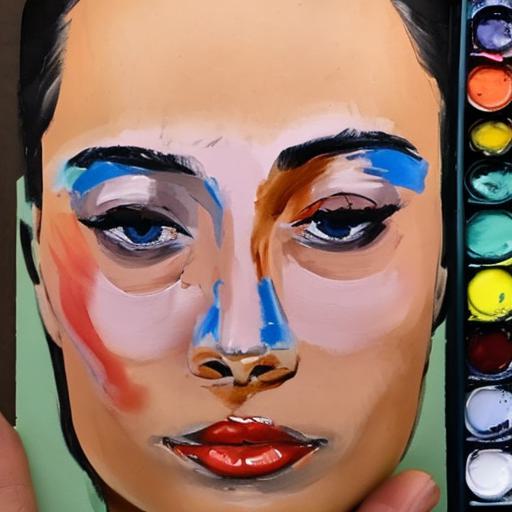
Creating Skin Tones
To create skin tones, start by mixing the primary colors to create a base color that closely matches the overall tone of the skin you’re painting. From there, introduce different hues such as red, yellow, and blue to add warmth, coolness, or subtle undertones to the skin. Observe the subject’s complexion and observe how different areas may contain different shades and hues. Keep in mind that highlights and shadows on the face can also affect the appearance of skin tones. It’s important to test and adjust the color mixtures on a separate sheet of paper before applying them to your painting.
Highlighting and Shadowing
Highlighting and shadowing are essential techniques for creating depth and dimension in your gouache painting. Highlights are areas of the face that catch and reflect light, making them appear brighter and more illuminated. Shadows, on the other hand, are areas that are shielded from direct light, appearing darker and less illuminated. When applying highlights and shadows, keep in mind the direction and intensity of the light source. By observing and analyzing the reference photo or your subject, you can determine the placement and strength of highlights and shadows to accurately represent the three-dimensional form of the face.
Sketching the Face
Finding the Center Line
To begin sketching the face, start by finding the center line. The center line divides the face vertically into two equal halves. It serves as a reference for aligning and positioning the facial features accurately. By ensuring that the center line is in the middle of the forehead, nose, and chin, you establish a solid foundation for your facial proportions. Remember that the center line is flexible and may slightly deviate based on the individual characteristics of the subject being painted.
Mapping Facial Features
Once you have established the center line, start mapping out the major facial features. Begin with the eyes, as they are often considered the focal point of the face. Pay close attention to the angle, size, and distance between the eyes. Next, sketch the nose, positioning it based on the reference points and proportions previously mentioned. Finally, sketch the mouth, paying attention to its horizontal alignment with the eyes and nose. Keep your initial sketches light and loose, as they will serve as a guide for the subsequent stages of the painting process.
Establishing the Face Shape
To create a realistic portrait, it’s important to establish the overall shape of the face. Faces can vary in shape from round, oval, square, heart-shaped, and more. By observing and analyzing the reference photo or your subject, you can outline the general shape of the face using light pencil strokes. Pay attention to the angles of the jawline, cheekbones, and hairline to accurately capture the unique characteristics of the individual. Refine and adjust the face shape until you achieve a likeness and representation that accurately reflects the subject.

This image is property of images.unsplash.com.
Blocking in the Colors
Planning the Color Placement
Before applying any paint, it’s helpful to plan out the color placement on your painting. This involves analyzing the reference photo or your subject and determining where the different color areas will be located. Pay attention to areas such as the forehead, cheeks, nose, lips, and chin, as they may contain different shades and tones. By planning the color placement, you can work more efficiently and effectively during the painting process.
Applying Base Layers
Start by applying the base layers of color to the different areas of the face. Use your previously mixed skin tones to establish the basic color of each section. Apply the paint evenly and consistently, aiming for smooth transitions between neighboring color areas. Gouache paints have a matte finish, which allows for easy layering and blending. Remember to keep the paint opaque enough to cover the underlying pencil sketches and to retain the desired color intensity.
Creating Gradation and Blending
To add depth and dimension to your painted face, incorporate gradation and blending techniques. Gradation involves applying paint with varying degrees of intensity, starting with a lighter color and gradually darkening it. This technique helps create a smooth transition between light and shadow areas. Blending can be achieved by gently feathering the paint with a soft, clean brush or by layering multiple thin washes of color. Experiment with different brushstrokes and techniques to achieve the desired gradation and blending effects.
Adding Details and Textures
Defining Facial Features
With the base layers in place, it’s time to define and refine the facial features. Start by adding more details to the eyes, including the eyelids, iris, and pupils. Pay attention to the unique characteristics of the subject’s eyes, such as the shape and color. Similarly, define the nose by adding more dimension and texture. Observe the reference photo or your subject closely to accurately portray the individual’s nose shape and any distinctive features. Refine and add details to the mouth, capturing the shape, color, and nuances of the lips. Remember to always step back and assess your painting from a distance to ensure proper proportions and likeness.
Adding Highlights and Shadows
Highlights and shadows are essential for creating a sense of depth and realism in your gouache painting. Apply highlights by using a lighter shade of paint or by leaving areas unpainted to represent the reflection of light. These highlights can be seen on areas such as the forehead, bridge of the nose, cheekbones, and chin. Shadows, on the other hand, can be created by using a darker shade of paint or by selectively applying thicker layers of paint. Shadows can be observed on areas such as the sides of the nose, under the eyebrows, and along the jawline. Remember to adjust the intensity and placement of highlights and shadows based on the direction and strength of the light source.
Creating Texture and Depth
To enhance the realism of your gouache painting, experiment with creating different textures and depths. Gouache allows for both smooth and textured brushwork. By varying your brushstrokes, you can simulate the texture of skin, hair, and other elements on the face. For example, using directional strokes can represent the flow and texture of hair, while dabbing the paint with a stippling technique can create the appearance of small pores or skin imperfections. Take your time and explore different techniques to add texture and depth to your painting, ensuring a more lifelike and visually engaging result.

This image is property of images.unsplash.com.
Refining and Adjusting
Reviewing Overall Proportions
Once you have added the basic details, take a step back and review the overall proportions of your gouache painting. Use a mirror or step away from your artwork to gain a fresh perspective. Assess whether the facial features are still in proportion to one another and to the face as a whole. Make any necessary adjustments to ensure accuracy and likeness. Even small tweaks can greatly enhance the overall effectiveness of your painting.
Making Corrections and Adjustments
During the refinement stage, don’t be afraid to make corrections and adjustments to your painting. If certain features, colors, or proportions appear off, take the time to correct them. Gouache is highly versatile and can be easily corrected, either by adding more paint, blending the existing paint, or erasing unwanted marks. Patience and attention to detail will greatly contribute to the quality and realism of your final piece.
Enhancing Depth and Dimension
As you refine your gouache painting, focus on further enhancing the depth and dimension of the face. This can be achieved by adding additional layers of paint to the shadows and darker areas. By gradually building up the layers, you can create more pronounced shadows and increase the overall three-dimensional effect. Remember to work in thin layers when using gouache, allowing the previous layers to partially show through for a more luminous and lively appearance.
Finishing Touches
Finalizing Highlights and Shadows
During the final stages of your gouache painting, it’s time to carefully refine and finalize the highlights and shadows. Take a close look at your reference photo or subject and observe any additional areas that may need more attention. Add delicate touches of lighter paint to the highlights, ensuring they are crisp and well defined. Similarly, deepen the shadows by subtly layering darker shades to enhance the contrast and create a more dynamic and realistic representation.
Adding Fine Details
To bring your gouache painting to life, focus on adding the fine details that make a face unique. Pay attention to smaller features such as eyelashes, eyebrows, skin texture, and individual facial expressions. Use a smaller brush to create precise and intricate lines and strokes. Adding these finer details will significantly contribute to the overall realism and character of your painting.
Signing and Protecting the Painting
Once you are satisfied with your gouache painting, don’t forget the importance of signing your artwork. Choose a discreet area to add your signature, ensuring it does not distract from the painting itself. Afterward, protect your painting by applying a fixative spray or varnish suitable for gouache paintings. This will not only preserve the colors and longevity of the artwork but also provide a protective barrier against dust, dirt, and sunlight.

Tips and Tricks
Experimenting with Different Techniques
Gouache painting offers a wide range of possibilities and techniques to experiment with. Don’t be afraid to explore different brushstrokes, blending methods, and layering techniques to achieve unique effects. Try stippling, dry brushing, splattering, or even scratching into the paint to create interesting textures and highlights. The more you experiment, the more you’ll discover your preferred style and technique.
Using Masking Fluid for Precise Details
If you’re aiming for intricate and precise details, consider using masking fluid. Masking fluid allows you to paint over areas that you want to protect, such as highlights or fine lines. Once the paint is dry, simply remove the masking fluid to reveal the preserved areas. This technique is particularly useful when working on features like eyelashes, intricate hair strands, or small patterns on clothing.
Exploring Mixed Media Possibilities
While gouache paint can be used on its own, it also pairs well with other mediums. Feel free to experiment with mixed media techniques to add additional dimensions and textures to your gouache painting. Consider incorporating colored pencils, pastels, or ink to enhance certain areas or create unique effects. However, ensure compatibility between mediums and perform compatibility tests before applying them to your gouache artwork.
Taking Care of Your Artwork
Drying and Storing Gouache Paintings
Gouache paintings dry relatively quickly, but it’s still important to allow them to fully dry before handling or storing them. Place the painting on a flat surface in a well-ventilated area, away from direct sunlight or extreme temperatures. Depending on the thickness of the paint layers, drying times can vary from a few hours to a few days. Once completely dry, you can store your gouache painting in a protective sleeve or portfolio to prevent smudging or damage.
Displaying and Framing
When displaying your gouache painting, ensure it is protected from direct sunlight and harsh lighting, as prolonged exposure can cause the colors to fade. Choose a frame that complements the style and subject of your painting, and consider using acid-free mats and UV-protective glass to further preserve the artwork. If unsure, consult a professional framer who can guide you in selecting the best framing options for your gouache painting.
Preserving and Cleaning
To keep your gouache painting looking its best, it’s important to take proper care of it. Avoid touching the painted surface directly with your hands to prevent smudging or transferring oils. If the painting gathers dust or dirt over time, gently brush it with a soft, clean brush or use a compressed air canister to remove surface debris. If necessary, you can also lightly dampen a clean cloth or sponge with water and gently blot the affected area. Always test any cleaning method on a small, inconspicuous area first to ensure it does not damage the painting.